


Did you know that a desktop browser has almost everything you need to make video calls? A client-side web app can use the WebRTC API, which is built into modern browsers, to access a system’s camera(s), start a video stream, and connect to a remote system, all without requiring any third party plugins. In the rest of this article I’m going to give a high-level overview of how WebRTC works and then show you how you can use the WebRTC API to create a simple video chat application.
What is WebRTC?
WebRTC is a collection of technologies that enable real-time audio and video streaming for web applications. Google released the initial implementation of WebRTC in 2011, the first stable release was in 2018, and the final W3C WebRTC 1.0 standard was released in 2021. Many popular applications currently use or have experimented with WebRTC, including Google Chat, Facebook Messenger, and Discord.
The WebRTC browser API has 3 major components:
- getUserMedia lets an app access a device’s cameras and microphones
- RTCPeerConnection manages an audio/video connection with another device (a “peer”)
- RTCDataChannel lets peers establish communication channels to send arbitrary data, like chat messages or files
WebRTC is built on several existing protocols:
- NAT (Network Address Translation), STUN (Session Traversal Utilities for NAT), and TURN (Traversal Using Relays around NAT) allow devices to address each other across the internet
- ICE (Interactive Connectivity Establishment) is a protocol that uses STUN and/or TURN servers to negotiate a specific communication path between clients
- SDP (Session Description Protocol) allows clients to tell each other what types of media they understand
One piece of functionality the WebRTC API explicitly doesn’t provide is any method for peers to discover each other, a task known as “signaling”. Peers on the same local network could simply broadcast their existence to other peers, but those on different networks or behind firewalls or NAT routers need to make use of an external service (a “signaling server”).
How does it work?
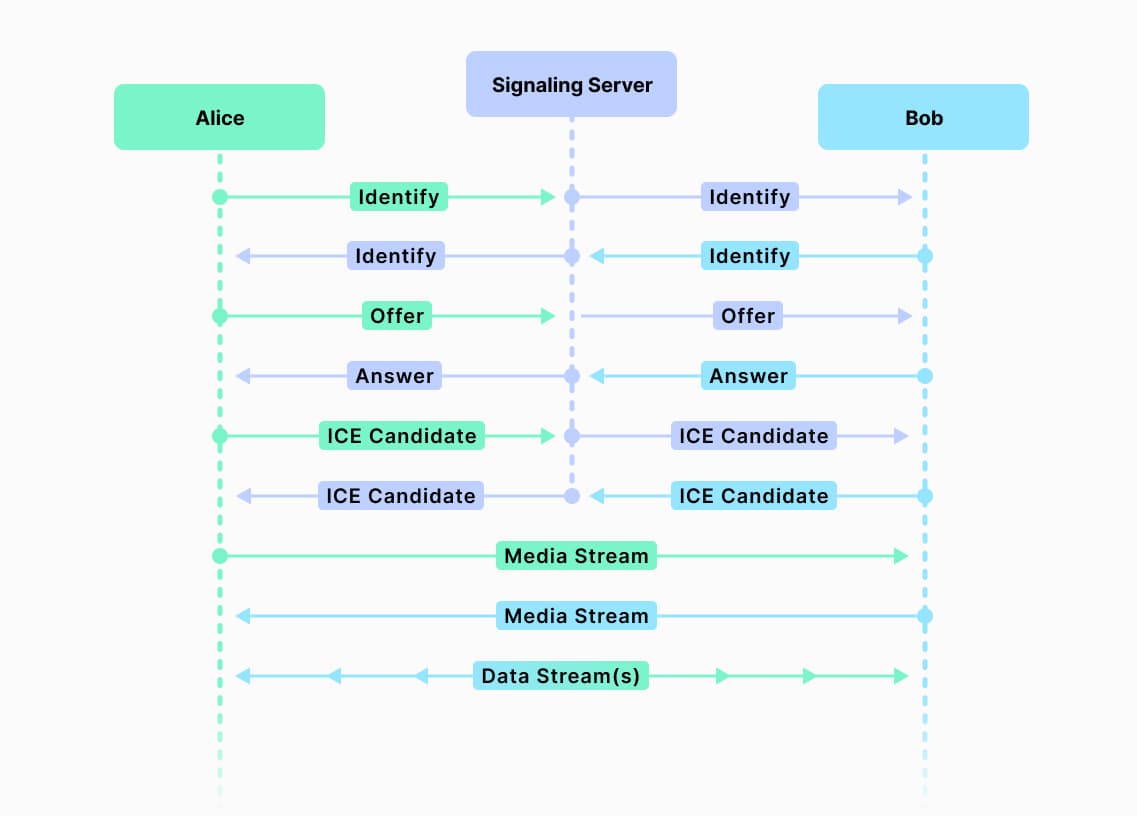
There are a number of moving parts involved in setting up a WebRTC connection, but at a (very) high-level, it works like this:
- Devices (“peers”) connect to a signaling server. This server gives peers a way to discover each other and coordinate when setting up a connection.
- One peer creates a new
RTCPeerConnectionobject and makes an “offer” to another peer through the signaling server. - The other peer receives the offer and creates their own
RTCPeerConnectionobject, using information from the offer to configure the connection. The receiving peer then sends an “answer” back to the offering peer through the signaling server. - The offering peer receives the answer and uses information from it to configure its connection to the receiving peer. At this point the peers know what codecs they can use to stream data to each other, but they don’t yet know how they’ll be sending data back and forth.
- The peers then send “ICE candidates” to each other. These allow the peers to negotiate the specific communication path they’ll use to stream data.
- Peers can also use their
RTCPeerConnectionobjects to open data channels to exchange arbitrary information, such as chat messages.
Signaling server
There are no particular requirements for the signaling server. It could use WebSockets, REST endpoints, or a proprietary protocol. The server doesn’t need to know anything about WebRTC, it just needs to facilitate communication between peers. SIP (Session Initiation Protocol) is a popular signaling protocol in real-world deployments due to its feature set and maturity.
Offer and answer
The “offer” and “answer” exchanged by the two peers contain SDP (Session Description Protocol) information. This information describes the media environment at one end of an RTC connection, including available codecs and browser capabilities. Offers and answers are generated by calling createOffer and createAnswer methods on an RTCPeerConnection.
Each peer will set local and remote “descriptions” on their RTCPeerConnection using the offer and answer. This allows both peers’ connection objects to know what resources are available at both ends of the connection.
- Offerer:
- Creates an
RTCPeerConnection - Creates an offer from the connection
- Sets the connection’s local description to the offer
- Sends the offer to the other peer (“receiver”)
- Creates an
- Receiver:
- Creates an
RTCPeerConnection - Sets the connection’s remote description to the received offer
- Creates an answer from the connection
- Sets the connection’s local description to the created answer
- Sends the answer to the offering peer
- Creates an
- Offerer:
- Sets its
RTCPeerConnection‘s remote description to the received answer
- Sets its
ICE candidates
After exchanging an offer and answer, the peers know what kind of media they can stream to each other, but not how to stream in. To be able to stream data to each other over the internet, the two peers exchange ICE (Interactive Connectivity Establishment) candidates. These are messages that describe the network environment visible from each peer, including any intermediate servers that may be required for the peers to talk to each other.
The ICE candidate exchange process typically takes place after the offer and answer have been exchanged. A client may generate multiple ICE candidates, and may continue to generate candidates even after communication has begun; this can allow the peers to switch to a better communication path if one becomes available.
Because the ICE candidate exchange happens before a WebRTC connection is established, peers will send candidates to each other using the signaling server.
Data channels
Peers can start streaming audio and video to each other once a communication path has been established. They can also create “data channels” that can be used to exchange arbitrary data. For example, a data channel could be used to send chat messages between peers, or to share files.
Data channels can be negotiated by the WebRTC API or externally (by the client application). When WebRTC is handling the negotiation (“in-band” negotiation), one side of a connection will call createDataChannel on an RTCPeerConnection object to open a channel, and the other side’s RTCPeerConnection object will emit a “datachannel” event containing a handle to the data channel. When negotiation is being handled by the app (“out-of-band” negotiation), both parties must decide on the same channel ID, and then both sides will call createDataChannel with the same channel ID.
An example
To see how all of these concepts can be put to use, we’ll look at a simple web application that lets two users on the same network start a video chat session. Think of it as Zoom Extra Lite. This application is very simplistic; its goal is to show how to use the WebRTC APIs to make a chat app rather than to demonstrate general best practices.
To run the application locally, clone the repository and follow the startup instructions in the README.
Application structure
The application has two parts, a client and a server, both written in TypeScript.
webrtc-demo/
  public/     <-- static web files
  src/
    client/   <-- browser client source
    server/   <-- server source
Both the client and server are vanilla JS (well, TypeScript). The client app has no dependencies — it’s only using standard web APIs, and the server only has two runtime dependencies, express and ws.
The client has two modules, main.ts and rtc.ts. The main module handles the interactive app functionality, while the rtc module manages an RTCPeerConnection and handles communication with the signaling server.
Like the client, the server also has two modules, index.ts and rtc.ts. The index module is a very simple SSL express server (some WebRTC APIs only work in secure contexts). The rtc module contains all of the signaling logic. It implements a very simple, custom protocol over WebSockets.
Client Architecture
The app UI is very simple. It has a video area and chat area, with controls under the video area to set the client’s display name, choose a camera, and enable or disable audio. (If connections are being made between two devices that are physically next to each other, or between two browsers on the same machine, you’ll definitely want to disable audio to prevent feedback loops!)
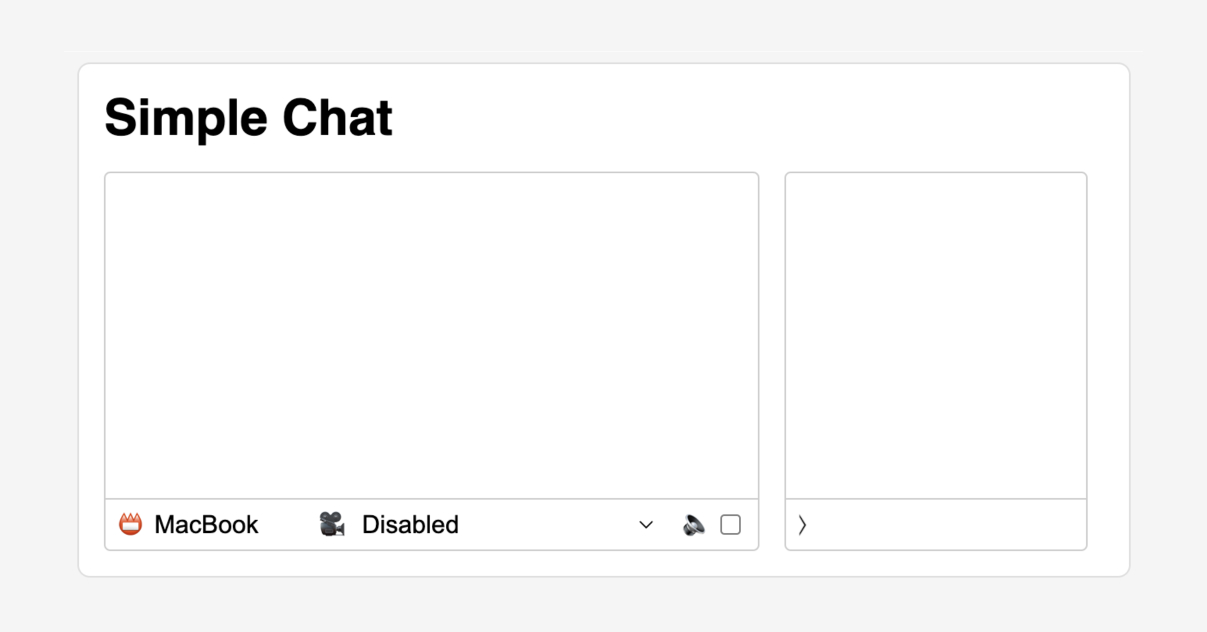
The camera selector is populated with all the media devices returned by navigator.mediaDievices.enumerateDevices() that support video. Selecting a camera will start a local stream from the camera which will be displayed in the video area.
When a client starts up, it creates an instance of the WebRTCClient class defined in rtc.ts, passing it a unique ID and the display name:
client = new WebRTCClient(id, name);
The WebRTCClient class manages interactions with the WebRTC API and with the signaling server. It provides methods allowing the main client code to update the display name, access a device’s cameras, open a video session with another client, and send chat messages. Code may also register with WebRTCClient to receive event notifications when other clients (“peers”) connect and disconnect from the signaling server, when a peer has made an offer to start a chat session, and when a chat message is received from a peer.
Along with creating the client object, the main app code registers listeners on client for various RTC events and initializes the UI. Then it waits for the user to select a camera.
When the user chooses a camera, the client object opens a local video stream and attaches it to the video element in the UI, then opens a WebSocket connection to /rtc. The server upgrades the connection to use WebSockets, then sends the client a “ready” message over the socket. The main purpose of the ready message is to let the client know if the server code has been updated since the client first connected (this is useful during development).
After receiving the ready message, the client object sends the server an “identify” message. This message contains a (theoretically) globally unique ID and a display name. This ID and display name will be sent to any other clients that connect to the signaling server, and is how different clients will refer to each other.
When clients connect to the signaling server, their “identify” messages are forwarded to any other connected clients, allowing each client to populate its peer list. Once at least two clients have connected to the signaling server, and once the user has selected a camera, the user can choose a peer to chat with.
Starting a video call
When a peer is selected, the app calls WebRTCClient.invite with the selected peer ID; this starts the WebRTC connection process described previously. The invite function creates a WebRTCPeerConnection, generates an offer, and sends it to the peer via the signaling server. It also opens a data channel to the peer with a predefined channel ID (0).
When the invited client receives the offer, its WebRTCClient instance emits an “offer” event, and the chat UI pops up a confirmation dialog asking if the user would like to accept the invitation. If the user chooses no, a “disconnect” message is sent to the offering client. This isn’t strictly necessary, but makes the connection process more efficient; otherwise, the offering client would have to wait for a timeout period to decide what the invitee wasn’t going to accept.
If the invited user accepts the connection offer, the invitee’s app calls WebRTCClient.accept, passing it the offer received with the “offer” event. The accept method creates a WebRTCPeerConnection, adds the offer to it, generates an answer, and then sends that back to the offering client. The invited client also starts listening for its WebRTCPeerConnection to generate ICE connection candidates; these are sent to the offering client as they are generated.
When the offeror receives the “accept” message through the signaling server, it adds the answer to its WebRTCPeerConnection and starts forwarding ICE candidates generated by its connection to the invitee.
When the offering and client browsers establish a video connection, each WebRTCClient instance will emit a “peerconnected” event containing a MediaStream. This stream is then attached to the peer <video> element in the client UI by assigning the stream to the element’s srcObject property.
Text chat
During a session, users may send text messages using the chat input in the UI. Text chat happens over the RTCDataChannel created when the RTCPeerConnection was being set up. This channel works similarly to a WebSocket. The channel object has a send method that the UI can call to send data to the other end of the connection, and emits “message” events when messages are received. Both user’s apps will subscribe to “message” events on their channel objects. When a user enters a message, their app will post the message to the chat area and then send it over the data channel to the other user. The other user’s app will receive the “message” event and post the received message to its chat area.
Ending a call
Calls can be ended simply by closing one end of a connection. The browser will eventually notice that the connection is broken and the RTCPeerConnection object will emit a “disconnected” or “failed” event. However, connections may be more efficiently shut down by having peers explicitly notifying each other that they want to disconnect. The WebRTC API doesn’t provide any specific mechanism for cleanly shutting down a connection, so it’s up to an application to decide how peers should be notified. In the demo app, that’s done by sending a “disconnect” message over the data channel, but it could just as easily be done through the signaling server.
Conclusion
In this post we’ve seen how the WebRTC API and a simple server can be used to make a video chat application. Of course, that’s just the beginning of what you can do with WebRTC. With its robust API and support for a variety of media types, WebRTC is an ideal solution for building video conferencing, chat, and other communication applications.