


Overview
Expo is a popular platform for building mobile applications with React Native. One of the features that Expo provides is the ability to use its centralized services, such as the Expo Application Services, for building and deploying apps. However, for some organizations, it may be desirable to use a private, or self-hosted, node registry for managing dependencies.
In this blog post, we will discuss the benefits of using a private node registry with Expo Application Services, as well as the steps involved in using such a registry. We will also discuss some of the common issues that may arise and how to troubleshoot them.
What is EAS?
Expo offers “Expo Application Services” (EAS) as a simple method for taking care of building your iOS and Android apps on centralized servers. This massively simplifies your local development environment as you no longer need XCode or Android Studio to build your applications, you can truly develop from anywhere.
When you submit your app to build on EAS, your source code is bundled up and sent to the server. The server then installs node dependencies, generates your native app source code, builds your app, and gives you a link to your compiled app bundle.
Why have a private repository?
There are several reasons why an organization may choose to use a private node registry.
- Security / Compliance – By hosting a private node registry, you can better control access to your organization’s dependencies, and ensure that only authorized users and systems can access them. This can help prevent the use of compromised or malicious packages, and make it easier to audit and track access to dependencies. Further, if your organization is subject to compliance requirements, using a private node registry can help ensure that the dependencies you are using are also in compliance with these regulations.
- Managing internal packages: A private node registry can be used to manage internal packages that are used only within your organization and that you don’t want to share with the public..
- Performance: Hosting your own npm registry can be faster and more reliable than using the public npm registry, especially if your team and developers are working across different locations.
Publishing to a private repository
There are a lot of ways to host a private node module. For convenience, we’ll be using GitHub’s NPM registry. The only requirement for EAS is that the server (not its contents) is publicly accessible on the Internet, and Github meets that requirement nicely.
If you want to follow along, we’ll create a quick little project to demonstrate the entire process.
mkdir private-repo
cd private-repo
npm init
Open up package.json and update the package name to include your organization/user name.
package.json
{
  "name": "@rorticus/private-repo",
  "version": "1.0.0",
  "description": "",
  "main": "index.ts",
  "scripts": {
  },
  "author": "",
  "license": "ISC"
}
Just to have something to work with, let’s create a placeholder function that could hold our shared code.
index.ts
export function sharedBusinessLogic() {
	return 1;
}
Next, we need to create a Personal Access Token to authenticate with GitHub. Currently, only classic tokens allow access to packages, so create one of those and make sure to add the package permissions.
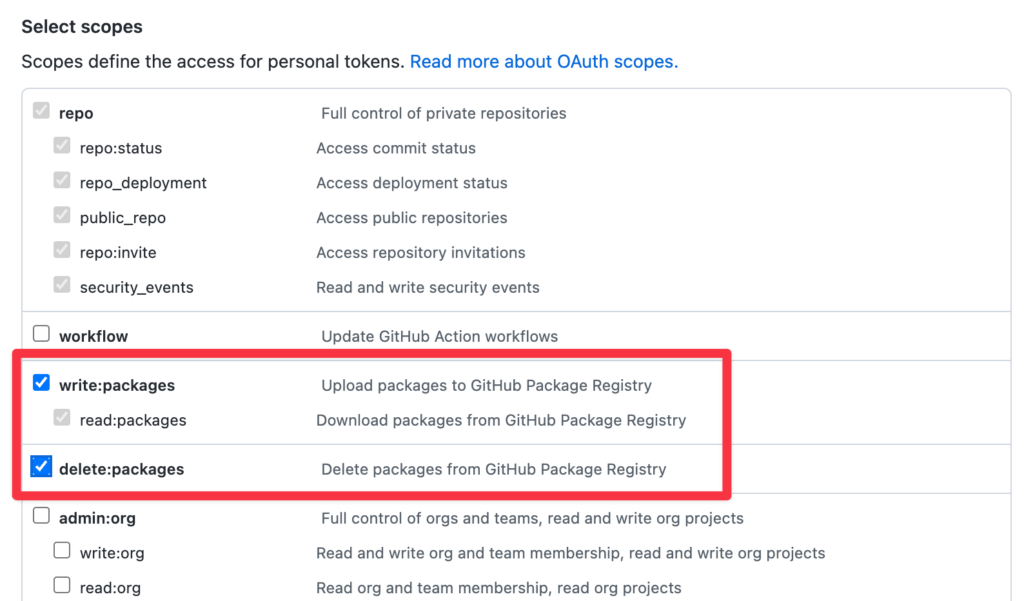
Make sure you save the token somewhere as once you click away, you can’t view it again.
Now create a .npmrc file in the directory to tell Node how to authenticate with GitHub. We’re essentially just telling Node that any package from @rorticus comes from Github.
.npmrc
//npm.pkg.github.com/:_authToken=${GH_PKG_TOKEN}
@rorticus:registry=https://npm.pkg.github.com
Notice that we are using an environment variable, GH_PKG_TOKEN, to keep the access token out of our repository. Even though it’s a private repository, it’s a good practice to keep secrets like this out of code repositories. For now, we’ll just set this token in our terminal session, but if you don’t want to recreate it every time you update your terminal, you can add it to your .bashrc.
export GH_PKG_TOKEN=YOUR_TOKEN_GOES_HERENote: We could also have created a user level .npmrc file instead of putting this file in our project directory. If you do it that way, feel free to put your access token right in the .npmrc file.
Great! Now we can push our module up to GitHub’s NPM registry.
npm publishYou should see something like this:
npm publish
npm notice
npm notice 📦  @rorticus/private-repo@1.0.0
npm notice === Tarball Contents ===
npm notice 218B package.json
npm notice 53B  index.ts
npm notice === Tarball Details ===
npm notice name:          @rorticus/private-repo
npm notice version:       1.0.0
npm notice package size:  318 B
npm notice unpacked size: 271 B
npm notice shasum:        c24f0f36db6125bf0665343945103012cab64b15
npm notice integrity:     sha512-GxJncvqr2dWKN[...]CAOu4pIo4UWuw==
npm notice total files:   2
npm notice
+ @rorticus/private-repo@1.0.
Fetching from a private repository
We’ve pushed our “shared code” up to a private node repository, so now we can pull it down into our Expo project.
First, create a new Expo project:
npx create-expo-app private-repo-demoIn the new project directory, add the same .npmrc file you created previously:
//npm.pkg.github.com/:_authToken=${GH_PKG_TOKEN}
@rorticus:registry=https://npm.pkg.github.com
Make sure to add this file to your repository as you’ll want anyone who can build with EAS to have this file as well. This file is going to be bundled up with your project and sent to EAS.
Now, install your private module:
yarn add @rorticus/private-repoLet’s modify the auto-generated App.js to use our new file.
App.js
import { StatusBar } from 'expo-status-bar';
import { StyleSheet, Text, View } from 'react-native';
import { sharedBusinessLogic } from '@rorticus/private-repo';

export default function App() {
  return (
    <View style={styles.container}>
      <Text>Our shared module says {sharedBusinessLogic()}</Text>
      <StatusBar style="auto" />
    </View>
  );
}

const styles = StyleSheet.create({
  container: {
    flex: 1,
    backgroundColor: '#fff',
    alignItems: 'center',
    justifyContent: 'center',
  },
});
Configuring EAS
At this point, you can publish and fetch your node module locally. This is a great start, but you’ll notice that if you try to build your app with EAS, it will fail. This is because EAS doesn’t have that GitHub access token you created earlier. Fortunately, this is super easy to fix.
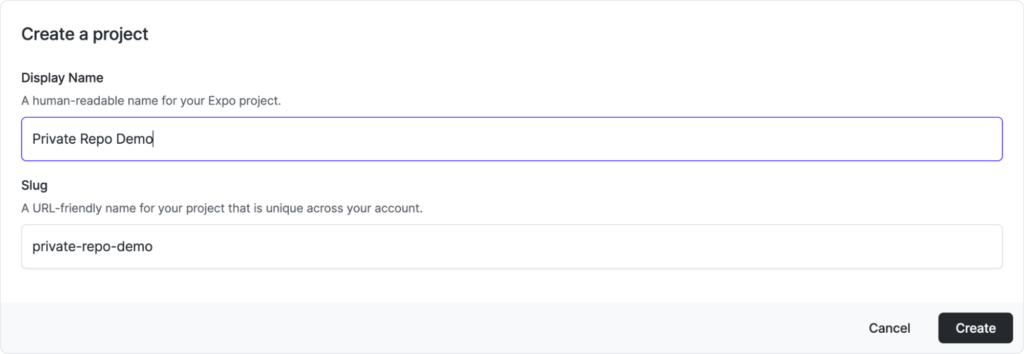
Log into the EAS dashboard and select your project (or create one if you haven’t already).
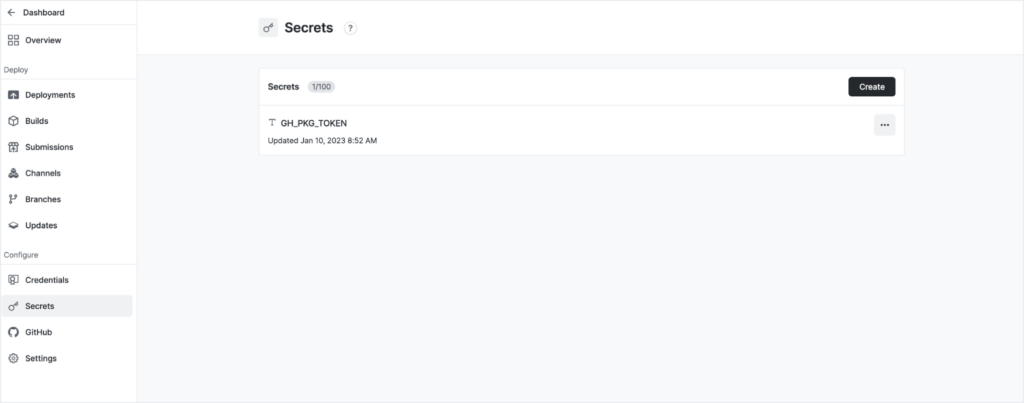
We will use “secrets” to tell EAS how to authenticate with our private npm registry. Secrets are environment variables that you can send to your builds that don’t appear in the log files or get stored in plain text. Private values like access tokens and API keys are great candidates for adding to your secrets. Click the Secrets menu option to create a new secret called GH_PKG_TOKEN to match the one you used in your .npmrc file, and enter your personal access token.
That’s it! Go ahead and test it out. From your Expo app directory:
eas build --platform androidAfter some time (could take a while depending on your EAS subscription plan), you should see a message indicating a successful build!
Conclusion
That was easy! Let’s look back on what we’ve done.
- We pushed our node module to a private node registry.
- We configured our local machines to be able to fetch from that registry.
- We configured EAS to authenticate with our private npm registry and built our app on a cloud server.
Using a private node registry with Expo Application Services can provide organizations with a way to better manage and control the dependencies used in their applications. The benefits of using a private registry include increased security, the ability to have greater control over dependencies, and the ability to comply with regulatory requirements. Additionally, a private registry can also be used to manage internal packages, better control versioning, and even boost performance.