


Getting started with Git can be a daunting task, especially if you are not at home in the command line. Fortunately, Git is a mature and widely used tool so there is a lot of reference and “How do I…?” material available. One aspect less commonly covered is using Git with some of the numerous Git GUIs available. This article will get you up and running with a basic understanding of Git concepts and how to manage your Git workflow with Git Gui, TortoiseGit, and Visual Studio Code.
Why use a GUI?
Git is a powerful, robust tool that runs on the command line by default. Using a GUI offers a more discoverable interface and some people prefer the aesthetics of GUIs over the CLI. For developers focused on writing code and using Git to collaborate with their team or contribute to OSS projects a GUI can be a pleasant tool that will comfortably handle the necessary tasks. Once you learn Git concepts you don’t necessarily need to memorize the specific steps to accomplish tasks – GUIs make it easier to discover (or rediscover!) how to accomplish a task when you know what your task is.

Git concepts
If you aren’t already familiar with software version control this short article is a good introduction.
The Git commit tree
Git stores changes in a series of commits. Every commit is identified by a unique hash. One thing that can be confusing to newcomers is that the arrows in Git tree diagrams point backwards. While the chronological flow for commits A then B then C looks like:
A → B → C
The commits are stored with parent references, not child references. A has no knowledge of B or C; B records that A is its parent and C records that B is its parent. This gives us a commit tree like:
A ← B ← C
File concepts in Git
- Working Tree: all of the files in the file system in your project folder. Git may ignore some files depending on the configuration in the .gitignore file.
- Staging Area: the “commit” command only commits files that have been added to staging. File diffs can be viewed between working tree content and staged content.
- Repository: the Git repository contains all commits and other Git data.
You add files to the working tree simply by adding them to your file system. Git’s “add” command, or Git Gui’s “Stage to Commit” action adds changes to the staging area. Git’s “commit” command adds changes to the repository.
Getting started
The first step is to create a Git repository. We’ll start with TortoiseGit for this task since its context menu is integrated into Windows Explorer.
Tip: The Tortoise VCS clients have quite a lineage going back to TortoiseSVN and even TortoiseCVS. If you have used those you’ll be right at home with TortoiseGit.
Create a new folder to start an empty project. Open the folder’s context menu and click “Git Create repository here”. This will add a “.git” folder to store Git’s data. At this point the repository is empty, the staging area is empty, all your project is in the working tree only and Git is not tracking anything. You can open Git Gui by clicking “Git GUI Here” in the folder’s context menu.
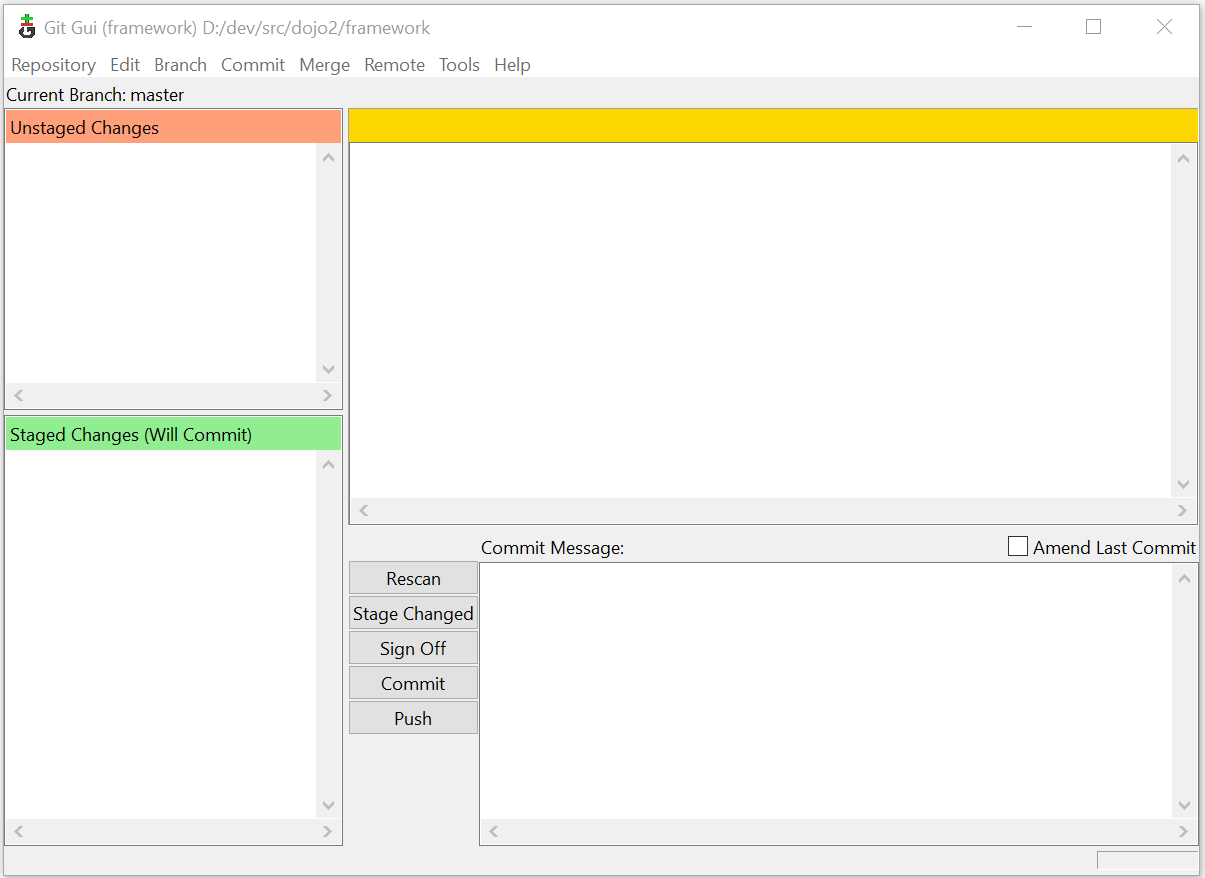
- Top-left shows unstaged changes (which at this point is all files)
- Bottom-left shows staged changes (empty)
- Top-right shows the diff for the selected file
- Bottom-right is where you can enter a commit message
Now add a plain text file to your project folder and click the “Rescan” button in Git Gui. The file will show up in the top-left pane. The “Stage Changed” button will add all changed files to the staging area.
Tip: You can add individual files from the menu: Commit → Stage to commit.
Click “Stage Changed” to add your new file to the staging area and you will see it move from the top-left pane to the bottom-left pane. Now edit the file and save changes, then rescan again. The file now shows up in both the unstaged and staged panes. Clicking the file in the staged pane will show a diff on the right of the file contents when you staged it. Clicking the file in the unstaged pane will show the additional changes you made after staging it.
Tip: This can be useful for incrementally tracking changes while you code – even if you are not ready to make a commit, you can stage your changes and then do experimental code changes. You can see a diff of your changes so you know exactly what you changed and you can even back out your unstaged changes (Commit → Revert changes) while preserving your staged changes.
Let’s go ahead and make our first commit – rescan and click “Stage Changed”. Now enter a commit message in the lower right pane and click “Commit”. At this point the panes on the left are empty indicating that the working tree and the repository are in sync. If you delete all files (but not the “.git” folder!) in your working tree you can still restore them from the Git repository (which is stored in the”.git” folder).
If you make a commit and realize you want to make another small change and want to include that in the commit you can check the “Amend Last Commit” checkbox above the commit message. Be cautious with this feature as it rewrites history. Git history is the record of what was changed in each commit and what parent each commit has. Git is very good at enabling multiple developers to collaborate on a project and synchronize changes, but when you rewrite history this can affect other people and complicate things. If you have not shared your commit with anyone you can safely amend commits. Once you share a commit with others (e.g. by pushing to GitHub) then rewriting history (amend, rebase) will affect them as well.
Sharing your work
There are various ways of sharing Git repositories, some of the most popular are GitHub and GitLab. To share your repository on GitHub you will need a GitHub account and you need to create a new empty repository on GitHub. To connect your local repository with GitHub you will configure a new remote. In Git Gui this is done from the menu: Remote → Add. The location is the URL with “.git” appended to it. For example the Dojo repository is at https://github.com/dojo/framework and its Git location is https://github.com/dojo/framework.git. The name is arbitrary, but it is a common practice to name the primary remote “origin”. You can add more remotes, for example the primary remote would be under your organization and each developer might create “forks” (GitHub copies) of the project in their GitHub account. You would need a remote for “origin”, another remote for your own fork, and if you want to work with branches from other developers you would need a remote for them.
Tip: Git Gui makes it easy to add remotes, but if you want to manage them in more detail you can do so in TortoiseGit: choose “Git Sync” from the context menu and click the “Manage” button to the right of “Remote URL” at the top.
With a remote configured you can now upload your Git repository to GitHub with Git’s “push” command. In Git Gui the “Push” button is just below the “Commit” button. TortoiseGit gives you a little more control over how you push with its dialog in “Git Sync”. After successfully pushing your repository to GitHub you will be able to browse your files on GitHub.
Cloning and pulling from GitHub
We’ve just covered creating a local repository and pushing it to GitHub. What if you want to copy a repository from GitHub locally? Open the context menu of the folder that will be the project’s parent and click “Git Clone”. In the URL field enter the Git URL (e.g. https://github.com/dojo/framework.git). Everything else can be left as-is, but you can rename the folder if you want (by default the dojo/framework repo would be cloned into the “framework” folder, but you can change the name).
With a GitHub repository created, a local repository created, and the GitHub repository configured as a remote you can synchronize the two using the Pull and Push buttons in TortoiseGit’s “Git Sync” window. Pull will download changes from GitHub to your local repository; push will upload changes to GitHub.
Play well with others
Adding new features to a project is commonly done within a branch. A branch is a named group of commits. A Git repository starts with a single branch, typically named “master” or “main”. Branches can be temporary, where a feature is developed in a branch and eventually integrated into the main branch, or they can be long-lived to maintain multiple versions of a project. Let’s create a feature branch from “master” in Git Gui:
- Click Branch → Create
- Give your branch a name
- For “Starting Revision” accept the default of “Local branch: master”
- Click “Create”
That’s it! You are now on a new branch. Any commits you make will be in the branch, not in “master”. Git Gui displays the name of the current branch just below the menu bar. You can now make some commits and push your branch to GitHub using TortoiseGit: choose “Git Sync” from the context menu, then click the Push button. Work can continue in parallel on the main branch and feature branches, and when a feature branch is complete and ready to be integrated you create a pull request in GitHub.
Rebasing a feature branch
Often when you are working on a feature branch work from other developers will be completed and merged into the main branch. Ideally work is broken up and scheduled in a way that minimizes conflicts, but they are inevitable.
One common workflow when integrating feature branches is to create a merge commit. A merge commit says “I added all these commits from this branch to master”, and potentially includes extra changes to resolve any conflicts. A merge workflow may be useful if you want your Git history to record who made what commits when, in what branch, and when they were merged. However, this type of history can be large and confusing. Many projects instead benefit from a history that records “this feature was added at this time by this person”.
Tip: A clean history makes finding out which commit broke (or fixed!) something with “git bisect” easier.
The recommended workflow to achieve a simple linear history is to use squash and rebase. Squashing a PR squashes all the PR’s commits into a single commit that is added to master directly (no extra merge commit). Rebasing is a method of resolving conflicts within a branch by rewriting the branch’s history. For a branch with commits C, D, and E, rebasing would change the commits (and assign new hashes) – this is why we say it “rewrites history”. The actual history is you created commits C, D, and E. When you rebase you change the history to record that you created commits C’, D’, and E’. The rebase commits will be identical if there are no conflicts, but will have a new parent. If there are conflicts you will have to resolve them during the rebase.
When should I rebase?
- If master has been updated with new code that you want to use in your branch
- If your PR has conflicts and cannot be merged
How to rebase
- Edit a file in your project to have 3 lines of text, save & commit to master
- Create a branch, edit line 3, save & commit
- Check out master, edit line 1, save & commit
- Check out your branch and look in the file – the most recent change to line 1 in master will not be present
- In Git Gui click Repository → Visualize <branch>’s History
- This shows the commit history, click on a commit to see the SHA1 hash – note down the hash for your last commit
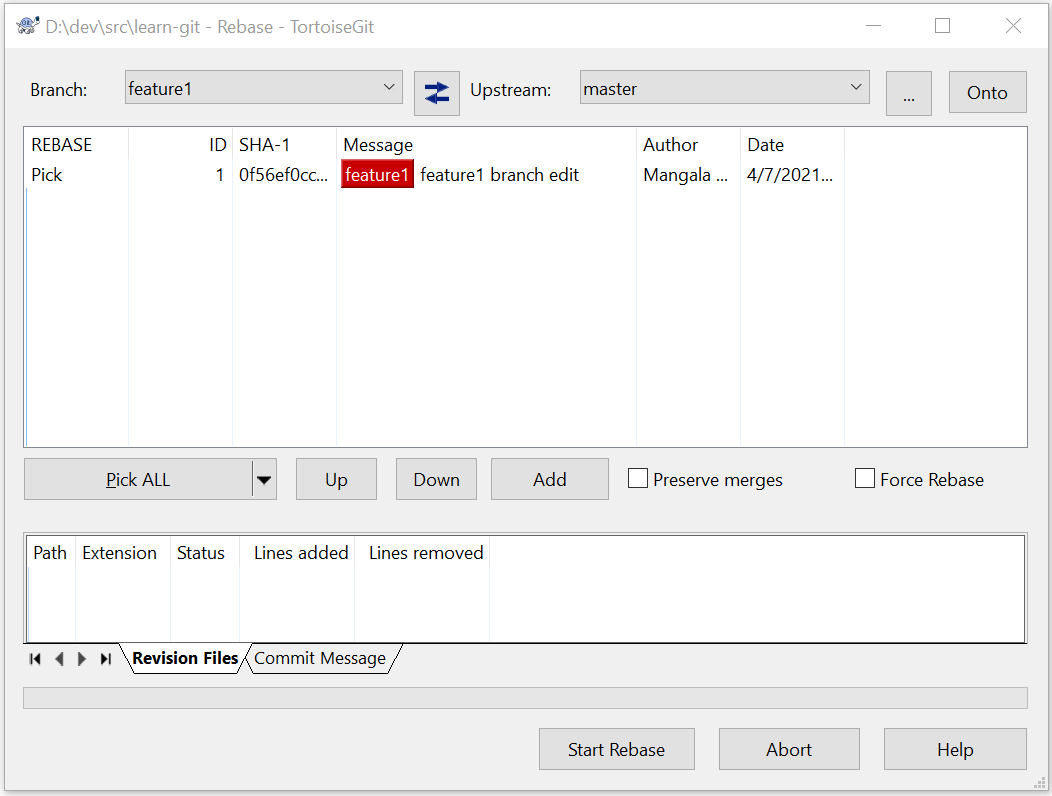
- Choose “Rebase” from TortoiseGit’s context menu
- Top left will show your branch
- In the top right set “Upstream” to “master”
- Click “Start Rebase” and “Done”
- Look at the branch history again – the commit to master has been inserted into the branch’s history, and your latest commit in the branch has a new hash
- History has been rewritten!
This was a simple rebase with no conflicts, let’s go through the process again with a conflict. You can continue with the same branch:
- Check out master, set line 1 to be “the first line of text”, save & commit
- Check out your branch, edit line 1 to be “the first line of (branch edit) text”, save & commit
- Check out master, set line 1 to be “the (master edit) first line of text”, save & commit
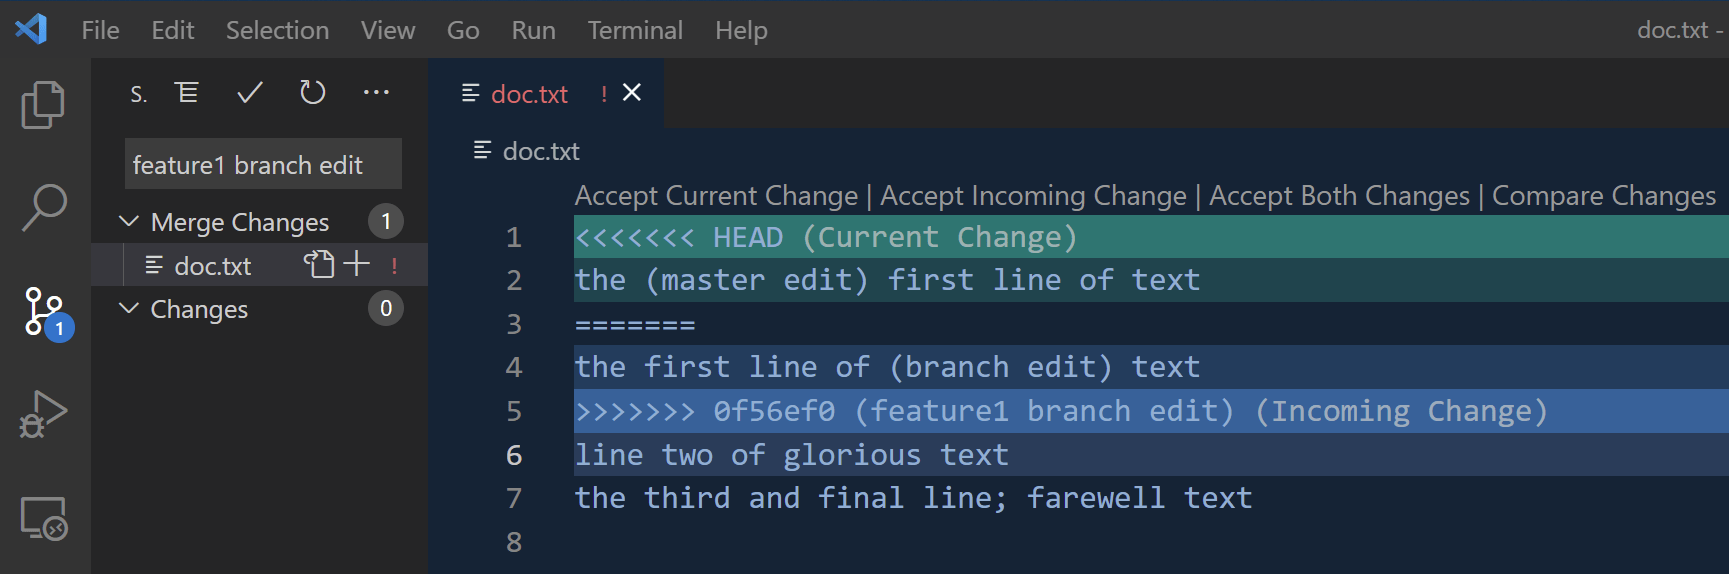
- Now when you rebase your branch on master the process halts indicating there is a conflict. VS Code provides a good UI for resolving conflicts, so open the project in VS Code and click the “Source Control” icon on the left.
- The left pane shows your files in two categories:
- Merge Changes: files with conflicts that cannot be automatically resolved (you need to fix these)
- Changes: files with no conflicts that can automatically be rebased (you don’t need to do anything)
- Open your file. VS Code will highlight conflicting lines, showing both versions of the line. “Current Change” is the value in the commit you are rebasing on (master). “Incoming Change” is the value in the commit in your branch. If one or the other is correct you can simply click “Accept Current/Incoming Change” in VS Code. If you need to manually edit the value you can click “Accept Both Changes” and edit the file as needed. When the conflict is resolved save the file and click the “Stage Changes” (➕) icon next to the file name.
- Back in TortoiseGit’s rebase dialog you can click “Resolved” in the file’s context menu and click “Commit” to finish rebasing.
As PRs are merged and the main branch is updated you may have to rebase your feature branch repeatedly to receive updates while continuing to work in your branch. If the updates to main do not affect your code there’s no need to rebase and incorporate them. When you create a PR on GitHub as long as there are no conflicts a squash merge will automatically squash and rebase all the commits in your PR into a single commit maintaining a linear history on master.
One challenge with rebasing is that the rebase process is performed for every commit in your branch. If you have a lot of commits, and a lot of noise in your change history (let’s do this, no that, hmmm, something else) then rebasing can be a bit of a waste of time resolving conflicts in commits that aren’t even relevant to the current state of the code. In this case you may benefit from squashing your whole branch to a single commit in a new branch. Then you move development to the new branch and when you rebase you are only dealing with a single commit.
Tip: Selective staging
Git Gui makes selective staging of individual lines very easy. Suppose you edited a file, made some changes and are ready to commit. But you have some debug statements, or unrelated feature changes in the file that you don’t want to commit. Looking at the diff in Git Gui you can select individual lines and click “Stage Line for Commit” – be sure to do this in pairs, as the diffing is done by line, not by word. When anything in a line is changed the diff records:
- Line x was removed (displays old content in red with a minus sign at the beginning)
- Line x was inserted (displays new content in green with a plus sign at the beginning)
So to stage a change to a single word in a line you have to stage both the removal and the insertion, which are displayed as two separate lines in the diff. If you only want to stage a few lines you can easily select them from the diff and stage them. Conversely, if you have a lot of changes and only want to exclude a few lines you can stage the whole file, then in the staged diff click “Unstage Line From Commit” for the relevant lines.
Git back to work
You now have a good foundation of Git principles and basic to intermediate tasks in some common Git GUIs to be able to get back to focusing on writing code while maintaining good collaboration practices. Some further items to learn about are cherry picking commits, squashing branches, and Git’s “bisect” command.