


Projects upon projects
You may not need a monorepo, but it’s useful to know what they are and what they have to offer. You could have a monorepo that is a mix of frontend, backend, utilities, linters, or more, each with its own set of build tools, and various needs. As a monorepo, it can help you tell a cohesive overall story for your projects. Monorepos, as a concept, have been around for a very long time. Java developers have been using Maven to manage multiple builds for years. However, monorepos for many web developers may not be as common.
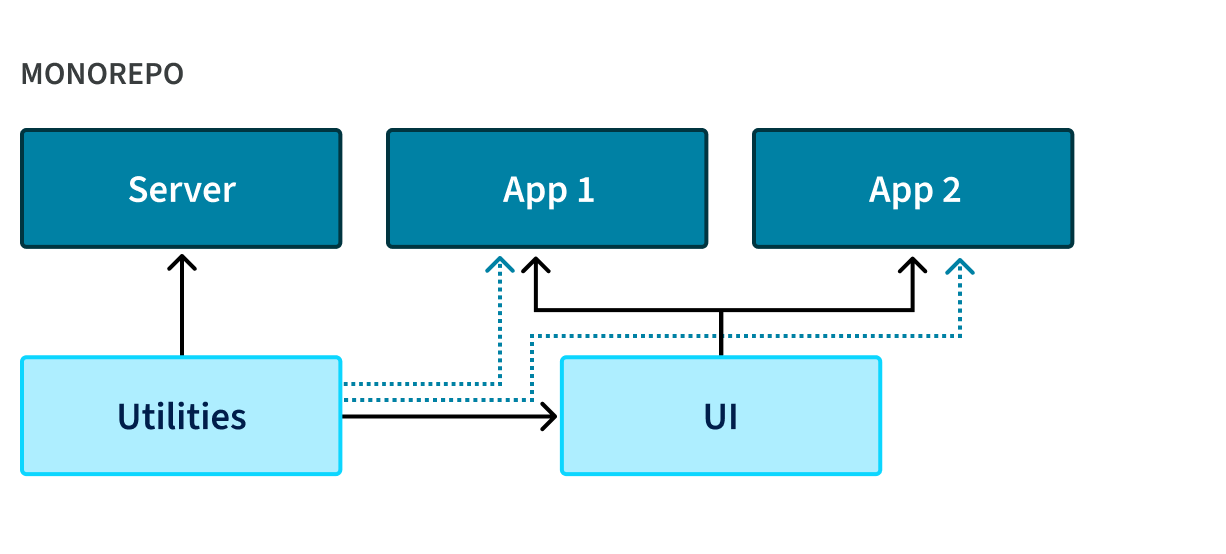
Monorepos can be useful when you have multiple teams working on various projects that rely on each other. For example, you may have a shared library of web components, a library of shared utilities, a server-side API, and various applications that incorporate them all. Each of these projects can be worked on by different teams, with the shared goal of building amazing products. There’s no rule that says you have to use a monorepo, but it could be useful to keep projects in sync.
Technical
Monorepos have a lot to offer teams of developers.
- Keeping dependencies in sync
- Increased collaboration and communication
- Overview of projects
That’s not to say there are not some drawbacks to a monorepo. Some challenges you might face when developing with a monorepo are the following:
- Excessive build times: Building a single package might be quick, but as a monorepo grows with dependent packages, so do your build times.
- Versioning of individual packages: Do you version all apps and packages the same? Do they all follow their own version numbers? You need to decide if all packages follow the same versioning or if they can be individual.
- Testing across packages: You might want to strive for standardized testing across apps and packages, using the same tools. Possibly sharing mock tools and fixtures.
- Continuous Integration: This can go hand-in-hand with build times and testing. For example, you can filter GitHub actions to certain packages and apps to prevent everything from needing to be built, to try and avoid building your entire monorepo. Depending on your dependencies between packages, this could still require multiple packages to be built at the same time.
- Managing issues/tickets: This can vary based on the platform you use. Assuming you are using GitHub, you can require that users specify the app or package they are filing an issue with. Depending on the number of issues your monorepo receives, it comes down to how you might organize them by label and determining if there are any other blocking issues in child packages.
If the monorepo is large, just cloning the git repo could be a reason to take a long lunch. Then you have to install the dependencies, and if you’re lucky you might remember what you intended to use the project for.
A monorepo project
You can get started with a monorepo using npm and npm workspaces. Other package managers, such as Yarn and pnpm also support workspaces, with some additional features such as symlinking that you might find useful. The npm workspaces allow npm to manage the dependencies in multiple packages in your repo. Assume we have a project with the following needs.
- Web Components
- Server-side API
- Frontend Application
We can do this in a few steps. We can start inside an empty folder named demorepo.
# initialize npm in an empty repo
npm init -y
Update the package.json to support workspaces for various directories.
"workspaces": [
  "apps/*",
  "packages/*",
  "server/*"
],
When using workspaces with npm, there are a few different ways you can install packages.
-wand specify the workspace you want to install packages-wsto install for all workspaces-Wto only install at the root
We will use some of these commands while building our project. For now, we can create these workspaces at the root of our monorepo.
UI
We can start by adding a Custom Element that can be used by any application in our monorepo. Create a folder in the path packages/ui and add a package.json.
{
  "name": "@demorepo/ui",
  "version": "1.0.0",
  "main": "index.js"
}
Notice that we have given the package a name that begins with an @ symbol. This isn’t required but is a good practice to scope your packages. This is the name you will refer to when you import your packages inside your monorepo and run npm commands specific to that package.
We can add a basic custom element to act as a button counter, which can be found here.
We don’t need to worry about building a custom element for this article, you just need to know this allows us to build a shareable button in our applications. This custom element can be consumed as-is, so no need for extra build tooling in the project.
Server
Our project is going to provide a simple API to provide a URL to a logo image and website for our users to visit. We can create a server/api folder and initialize it with a package.json.
{
  "name": "@demorepo/api",
  "version": "1.0.0",
  "main": "index.js",
  "scripts": {
    "serve": "node index.mjs"
  }
}
Notice again, we’ve given this project a descriptive name. We can use that now at the root of our monorepo to install a couple of libraries for our simple API. When we use npm install, we can reference the package name of the workspace to specify the dependencies.
npm i express cors -w @demorepo/apiIf you look at the structure of your project, you’ll notice that none of the workspaces have a node_modules folder. Instead, there is a single node_modules folder at the root of the monorepo, and npm will manage the dependencies of the workspaces.
/demorepo
–/node_modules
  /apps
  –/counter
  /packages
  –/ui
  /server
  –/api
Now we can add an index.mjs file and use express to build a basic API.
// server/api/index.mjs
import express from "express";
import cors from "cors";

const app = express();
app.use(cors());

const PORT = 9999;

app.get("/api", (req, res) => {
  res.json({
    title: "SitePen",
    url: "https://www.sitepen.com/",
    imageUrl: "https://images.sitepen.com/wp-images/2022/08/SitePenLogo_Light.svg",
  });
});

app.listen(PORT, (err) => {
  if (err) console.log(err);
  console.log("Server listening on PORT", PORT);
});
With our project’s API and custom element complete, we can begin to bring it all together in our application.
Application
We can navigate to the apps folder and use Vite to initialize a Svelte application.
npm init vite@latest counterFollow the steps to select a Svelte application, without TypeScript, just to keep things simple for now. When you initialize a project with Vite, it won’t install dependencies automatically. You can do this by navigating to the root of the monorepo and run npm install, which will install any dependencies required by our workspaces.
In the Svelte project, we can update the App.svelte file to use our API and custom element.
// apps/counter/src/App.svelte
<script>
  import '@demorepo/ui';

  import { onMount } from 'svelte';

  let url;
  let imageUrl;
  let title;

  onMount(async () => {
    const response = await fetch("http://127.0.0.1:9999/api");
    const data = await response.json();
    url = data.url;
    imageUrl = data.imageUrl;
    title = data.title;
  })

</script>

<main>
  <div>
    <a href={url} target="_blank">
      <img src={imageUrl} class="logo" alt={`${title} logo`} />
    </a>
  </div>
  <h1>Vite + Svelte + Sitepen</h1>

  <div class="card">
    <demorepo-counter/>
  </div>

</main>

<style>
  .logo {
    height: 6em;
    padding: 1.5em;
    will-change: filter;
  }
  .logo:hover {
    filter: drop-shadow(0 0 2em #646cffaa);
  }
</style>
Notice that we can import our custom element (<demorepo-counter/>) via the workspace name, and we can also reference the URL to our local API. We just have one more step to be able to run our entire monorepo.
Bring it all together
At this point, we need to be able to run both our application and our API at the same time. Without trying to work some npm script wizardry, we can use a package called concurrently to run multiple npm scripts at once. We can use the -W flag with npm to only install at the root of our monorepo.
npm i -W concurrentlyEach of our packages already have scripts to run, so we need a script at the root to run them for us. We can add some scripts to the root package.json to handle this for us.
"scripts": {
    "start": "concurrently \"npm:dev*\"",
    "dev:app": "npm run dev -w @demorepo/counter",
    "dev:server": "npm run serve -w @demorepo/api"
},
Now we can run npm start, and our application and API will run at the same time. We can navigate to the URL the application will provide for us and see our project in action!
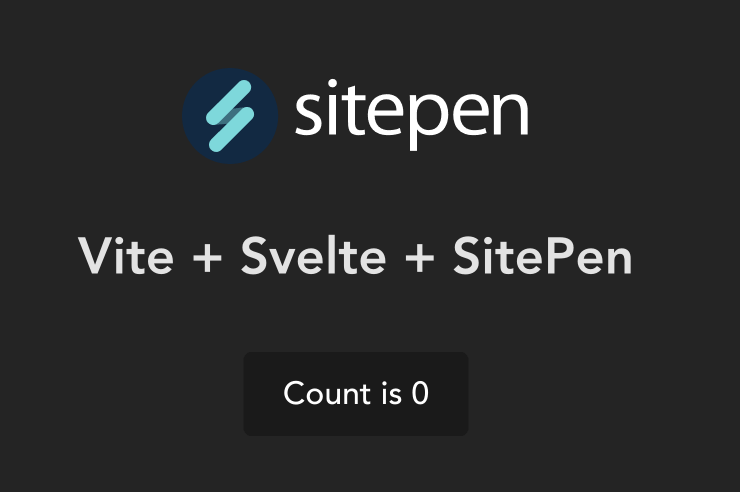
We can verify everything works as expected by clicking our Counter custom element and clicking on the logo to verify it takes you to the correct site.
Congratulations, you just completed your first monorepo!
Example code for this post can be found on GitHub.
A look ahead
At some point, you might find that you need some more capabilities for managing your monorepo. You might have to manage multiple dependencies across packages or have packages that depend on other packages and libraries. You might want to implement build caching, local or distributed, to save on overall build times. There are a number of projects available to choose from.
- Nx: Allows you to have a fine-tuned build system where you can define what is cacheable. Also provides an extensive plugin system and tooling for libraries and frameworks.
- Lerna: Probably the first and most popular build tool for JavaScript monorepos. Lerna is now powered by Nx and takes advantage of its runner and cache tooling.
- Turborepo: Works very similar to other monorepo tooling, but requires minimal configuration and has robust caching support.
All these various tools, and many more, have different levels of utility to offer developers and address some drawbacks you might hit. For example, running builds on a larger monorepo can take a long time, and have a web of dependencies on each other. These tools can manage dependency graphs, cache your builds (both local and remote), and improve overall performance. They also provide commands to run projects in parallel without the need for a separate npm command. It might be a good idea to start with npm workspaces, and once you find yourself struggling with dependencies and complicated builds, then take a look at what these other tools have to offer.
Summary
You may not have the need to lump multiple projects into a single repo. Your current workflow of managing multiple packages in their own repos might be working great, especially if it’s a large package with a complicated build system of its own and multiple contributors. However, you might find that the benefits of working in a monorepo are worth the initial growing pains. Having a monorepo can encourage increased collaboration among teams and quickly highlight the impacts of changes in one package against others. Even if you don’t need a monorepo today, it would be a good idea to have some basic understanding of them so you know if the time comes when you do.